Thursday, December 19, 2013

Christmas Projects 2013

Hey Guys! Today I would like to share some Christmas projects I've been working on since the beginning of December. I really enjoy this time of year. There's something about the whole Christmas spirit...celebrating Jesus Christ, seeing loved ones you haven't seen in ages, and putting smiles on kids faces.
I am entering my projects in this new challenge site I found whimsicaltwist.com. I decorated a wreath, made some Christmas cards for family and friends, and made an ornament. I got my inspiration from youtube and pinterest. There is so much talent on those sites.
 Here are my projects...


Happy Holidays from my family to yours!!!

Sunday, October 27, 2013

Cardabilities #85-"Rejoice"

Hi Everyone...I'm Back!
 Over these last couple of months I've lost my mojo. I have been crafting just not as much. I'm glad to be back in the mood to create and share my work. 
  Cardabilities has sketch #85 up. My Christmas card was inspired by one of their design team members- Adriana Bolzon. This was an amazing sketch and I couldn't wait to play along.


I can't wait to start making the rest of my Christmas cards! I love everything about Christmas-it's theme and spirit.
 
Supplies:
Paper: My Mind's Eye-Santa Claus, Recollections
MS Punch-Leaf
Flower
Ribbon
Button
Sizzix Die-Flourishes
 
Thanks for visiting and I hope you return!!
 
Toneisha


Friday, August 2, 2013

Hello my fellow bloggers!
 Can you believe how hot the weather has been? I don't know why I am so surprised by it. I also can't believe that July has flown by and it is now August. I have been a busy little bee with my kids appointments, vacation, and my job interviews. I hope your summer has been awesome so far.
 My husband and I took a trip to New Orleans last year to celebrate our Anniversary. I finally finished the mini album in June but I didn't have time to upload it to my blog. I must say there are quite a few pics, so here is the final product and I hope you like...


The paper is from Echo Park For the Record. Thanks for stopping by!
 
xoxo
 

Sunday, July 7, 2013

Mojo Monday #300

Hello Again!
     I love the Mojo sketches, always have, but don't always get to play.  This week they are celebrating their 300th sketch and have lots of prizes to give away and you can join as many times as you want. I truly love the challenge each week to create using a Mojo sketch and this week is no exception.  Here's what I came up with using this week's sketch layout.

Here's my take...

 
You should head on over to Mojo Monday and join in on the fun!

Thanks for stopping by!
xoxo
 

Thursday, June 27, 2013

Layout Week Day Five: So Good

Hi and Happy Friday! 
  I'm here with a quick post to share. I am playing along with Kathryn Scraps Challenge Layout Week Five. I used the sketch she provided. Supplies used were My Minds Eye, EK Success flower border punch, pearls, brads, corrugated cardboard, and homemade flowers. I used a ink resist technique on my banners.
Here is the sketch:
Here is my take:


I am also playing along with Scrappy Friends June Blog Challenge. I used Rochelle's photo for my inspiration and Kristi B. ink resist challenge. I really enjoyed using the color combination in this layout. Thanks for stopping by.
 
xoxo


Tuesday, June 25, 2013

Layout Week-Day Three: Let's Go

Hello my crafty friends!
 I didn't realize that I had been missing in action for this long. I haven't made a post since May. I have been busy making a mini album for my husband and I anniversary get away from last year. I really haven't been in the mood to make any cards or layouts, until today.
Kathryn with Kathryn Scraps had a week of showing a different layout a day with tutorials and techniques. It's always refreshing to watch her put together layouts. She is also having challenges on her blog! Each challenge has a different giveaway! Today is the last day to join this Challenge-Day Three. I enjoyed using the technique she used in this layout.
Here is the sketch:
 
Here is my take:
 
I had more pics of my layout but for some reason they wouldn't upload. I made myself a template using Kathryn's tutorial. To make my sun rays I sprayed water and FolkArt Acrylic paint-Moon Yellow. The paperline is Pinkpaislee Portfolio. The pic was taken when my son was about 7 or 8 months old. We were loading the car about to head to the mall. My little man was getting frustrated. He had this look on his face as if he was telling us let's just go...lol! I hope you head on over to participate.
Thanks for stopping by,
xoxo

Monday, May 13, 2013

Paper Secrets: Thank You

Hi Crafters!
  I hope everyone had an amazing weekend celebrating Mother's Day! Hubby surprised me with an out of town celebration. I had a really nice and relaxing day. With that being said, I couldn't wait to get back to my desk and play...lol! Paper Secrets is having their first monthly card challenge. Create a card using their sketch and one lucky winner will be chosen to be featured as a Guest Card Designer.
Here is the sketch:
 
Here is my take:


Supplies Used:
Recollections Cardstock
MME Breeze
Studio G stamp
Martha Stewart Embossing Pad
Stampendous White Embossing Powder
Recollections pearls
Handmade flower
Ribbon and lace from stash
 
Hope this brings you some inspiration!
 
xoxo


Wednesday, May 8, 2013

April Build-a-Flower Challenge with Jules!

Good Afternoon Crafters!

 Today I have a quick and easy scallop layered flower tutorial. Jules with The Wild Orchid Crafts Design Team is having a "Build A Flower" challenge on her blog. The challenge is to do a blog post showing pictures of a flower tutorial. Five to Eight pictures are required. The flowers must be in layers. The deadline is by midnight  May 8th. This is totally not my original idea. I have seen this tutorial many times on youtube. I would like to share how I create this type of flower my way.
Here is my tutorial...
Gather 5 scalloped circles
Punch a hole in the middle with a crop-a-dile
Secure eyelet with crop-a-dile(a brad can be added as well)
Saturate with water or glimmer mist
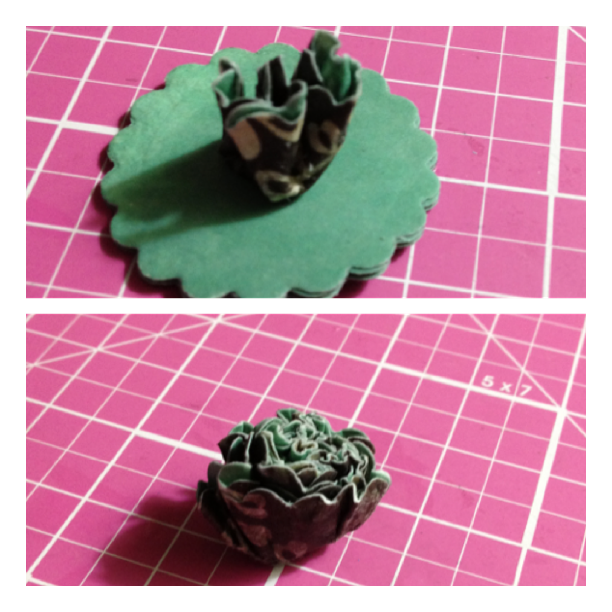
Scrunch the layers of circle into a ball
Slightly dry flower with heat tool
While the flower is wet, slightly open the layers
Continue drying the flower
Once dry, continue to open layers until desired look


Thanks for stopping by! Hope you enjoy!
 
xoxo